Finished wiring the fuse panel

Cut all the power wires to length and labeled each. Stripped each wire and terminated with a crimp on fuse holder. Had to buy yet another crimp tool for these… https://www.amazon.com/dp/B004P2VAVM/ref=cm_sw_r_sms_apip_atOw34QqkDCOo

I’m going to open a crimper museum when I’m done with the plane.


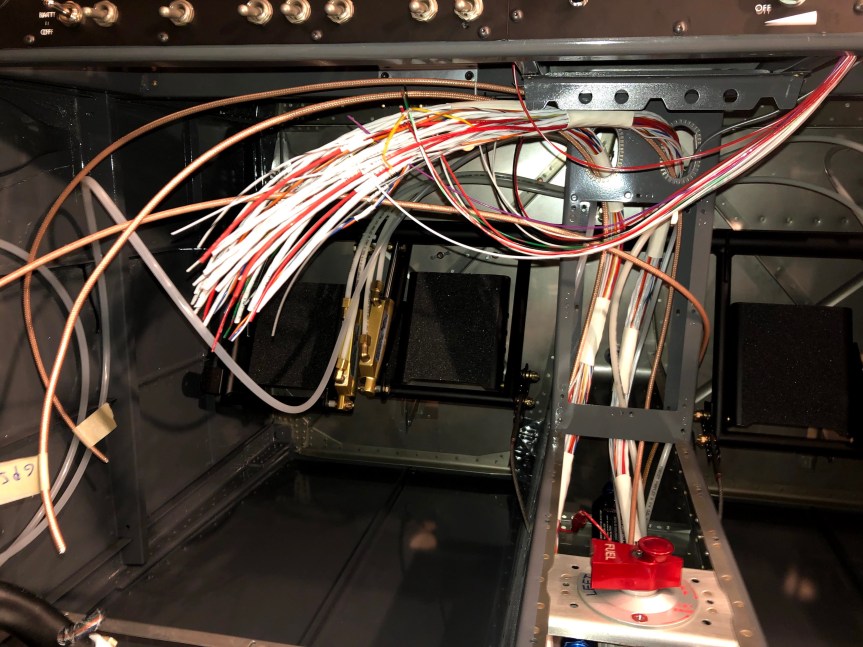
Inserted all of the terminated power wires into the Bussmann fuse block that I bought from Waytek.

img_4612


Mounted the fuse block and the Van’s power module kit, popped the fuses in and put the cover on.


I temporarily connected the battery and everything powered up with out incident or smoke. I still need to wire the GMU 11 in the left wing. Then I can plug the wing harnesses into the fuselage and test everything out. I also verified that PFD1 would power up from the IBBS. Very exciting to see all the avionics light up though.

img_4618


Today’s Time (hours): 8.0
Finish kit (hours): 165.0
Total Time (hours): 899.0


Finished wiring the panel

Wired the GSU 25 ADAHRS.

img_4597


Wired the G5 backup flight instrument.

img_4598


Pilot side complete. I still have a bit of tidying up and lacing to do. But everything is wired.


Terminated all of the ground lines to the ground block.

img_4601


Wired the PFD2 GDU 460.

img_4602


I still need to install the fuse panel and wire it up. I also need to wire the GMU 11 in the wing and reconfigure the connectors at the wing roots. Then the wiring will be complete.


Today’s Time (hours): 7.0
Finish kit (hours): 157.0
Total Time (hours): 891.0


Wired all the switches and the PFD-1

It’s been another busy week at work but managed to get in a few hours during the evenings and a bunch of time today.

Wired all the switches and routed all of the required power and ground wires as well as all the wires through the firewall for alternator, battery and starter relays, and magnetos.

img_4574


Reinstalled the PFD-1 GDU 460 and G5 backup instrument. I plumbed in the pitot, static, and AOA lines.

img_4594


Wired up the GDU 360. I was a real rats nest behind the panel so i used some temporary wire ties to keep things organized while I finish wiring the GSU 25 and the G5. Then I’ll secure everything properly and lace up the wire bundles.


I also realized that despite all of my wiring planning, I had accidentally omitted the GTP 59 temperature probe form the plan. I ran a shielded three-conductor cable from the left wing root to the panel.


Today’s Time (hours): 12.0
Finish kit (hours): 150.0
Total Time (hours): 884.0


Finished wiring the GEA 24, GAD 29, and GAD 25

Made up harnesses for the TO/GA button and panel light dimmer switches. I mounted them back in the center panel and wired the corresponding connectors under the panel. I used micro molex connectors to make the connections.


I received the stranded thermocouple wire I ordered from McMaster Carr. SO I was able to finish wiring up the GEA 24.


I wired up the GAD 29.

img_4554


I wired up the GAD 27.


Making progress. Glad I made this wiring list.  It’s been super helpful as a reference and to keep track of my progress. The terminations highlighted in green are complete.

img_4563


Today’s Time (hours): 10.0
Finish Kit (hours): 138.0
Total Time (hours): 868.0


Wiring Continues

Haven’t posted in a while but making steady progress.

Made a wiring harness for the TO/GA switch.

img_4539


Wired up the canopy harness.

img_4542


Relocated the GAD 27, GAD 29, and GEA 24.


Made up two of the four connectors for the GEA 24. Had to re-order the thermocouple wire for the EGT and CHT connections. I accidentally ordered solid wire instead of stranded. Connecting the engine to the airframe, there’s enough motion in those wires that I wasn’t comfortable using the solid wire. It probably would take long for it to work harden and break.


SO. MANY. WIRES!!!

img_4548

So glad i borrowed Jared’s engine stand rotisserie. I can’t imagine doing this with the airframe upright.


Today’s Time (hours): 8.0
Finish Kit (hours): 128.0
Total Time (hours): 858.0


Wired the radio stack

Made my first CAN Bus daisy chain termination for the GTR 200B com radio.


Finished wiring the COM radio connector.


Terminated the antenna cables with BNC connectors for the transponder and com radio and a TNC connector for the GPS.


Made up the connector for the GMC 507 autopilot control. Pretty simple… Power, Ground and CAN bus.

img_4532


Installed the com radio tray and the transponder and GPS trays that I had pre-wired. I routed and tied all the wires.


Today’s Time (hours): 8.0
Finish Kit (hours): 120.0
Total Time (hours): 850.0


Progress continues on wiring

I’ve neglected to post over the past week. Been a busy week at work. I have made some good progress though.

I vinyl-wrapped the fuse block panel and screwed the fuse block into it. I made a bus bar from a strip of copper to tie together the upper and lower buses of the fuse block.


I drilled some system holes through the left seat ribs, installed snap bushings, and ran the pitot and AOA lines from the wing root to the panel.


Drilled a couple of system holes in the lower sub-panel. Routed the the wires for the battery backup. Terminated the grounds for the the IBBS and the IBBS master switch.


Made up the connectors for the GTX 45R transponder and the GTN 625 GPS. I also started on the GTR 200B COM radio but didn’t get a picture.


Today’s Time (hours): 6.0
Finish Kit (hours): 112.0
Total Time (hours): 842.0


Began wiring the panel

I’ve spent quite a bit of time researching and documenting a plan to make the wiring easy. I complied a list of wiring nodes in a spreadsheet that I can use as a checklist to work my way through the project. You can see my work here… Wiring Plan

Didn’t actually wire anything today but rather did a lot of the prep work. I fabricated a center panel that will hold the fuse block in the center pedestal. I purchased the power panel option from Van’s which included the sheet metal for the center console. I purchased the 32 position Busman fuse block from Waytek.


Prepped everything up and painted it to match the interior.

img_4480


Removed all of the avionics and the panels. I probably could have left the stuff mounted to the sub panel and left the panels in place. But when I had mounted everything with black oxide steel screws and subsequently learned that they would rust over time. So I purchased black oxide stainless replacements. This was the most opportune time to replace them all.


I installed a ground block being careful to remove all the paint and scuff up the sub-panel to ensure a good electrical connection. I re-mounted the backup battery, the GAD 27, GAD 29, and GEA 24 to the sub panel.


I drilled a couple of new wire holes through the bottom of the stand-offs and installed snap bushings. The original holes interfered with the GTX and the switches in the bottom of the middle panel.

img_4481


Today’s Time (hours): 8.0
Finish Kit (hours): 106.0
Total Time (hours): 836.0


Completed Common Fuselage Harness (Section 55)

Installed the pilot and copilot headset jacks. Installed the music jack and the power jack. I ran the pilot’s control stick wires.


That’s a whole bunch of wires. Terminating all of them should be fun!

img_4122


Today’s Time (hours): 2.0
Options and Miscellanea Time (hours): 48.0
Total Time (hours): 737.0


More wiring

Run the left side of the main harness. Terminated the antenna connections; TNC for the GPS and BNC for the com and transponder. Only did the antenna side. I’ll get the panel end when I wire the panel.


Getting the snap bushings into the wire guides was a huge pain in the ass. super tight. especially with the additional can bus wire. I ended up pulling that wire out and getting the snap bushings in. Once they were in I was able to push the can bus cable through.

img_4109


On a brighter note, my seats came in today. Abby at Flightline Interiors did an amazing job. Very happy.

img_4107


Today’s Time (hours): 2.0
Options and Miscellanea Time (hours): 46.0
Total Time (hours): 735.0