Installed brakes, sealed firewall, finished cowls and baffles

Sealed up the firewall pass throughs. I followed the Van’s instructions on the left side using fire sleeve and RTV. It was challenging to get the fire sleeve stuffed into the fitting around the wire and also to safety wire the outer sleeve in place. Big hands. Small spaces. On the right side, there was no way I was going to be able to get my hands into the space necessary to take this same approach. I was able to form a cone around the cables/wires with tape. I then used a calking gun to fill the void with 3M Fire Barrier 2000+. The tape on the forward side formed a mold to force the sealant between all of the wires. Made a huge mess but it worked.


Installed AN fittings into brake calipers. Fabricated the brake lines and installed.


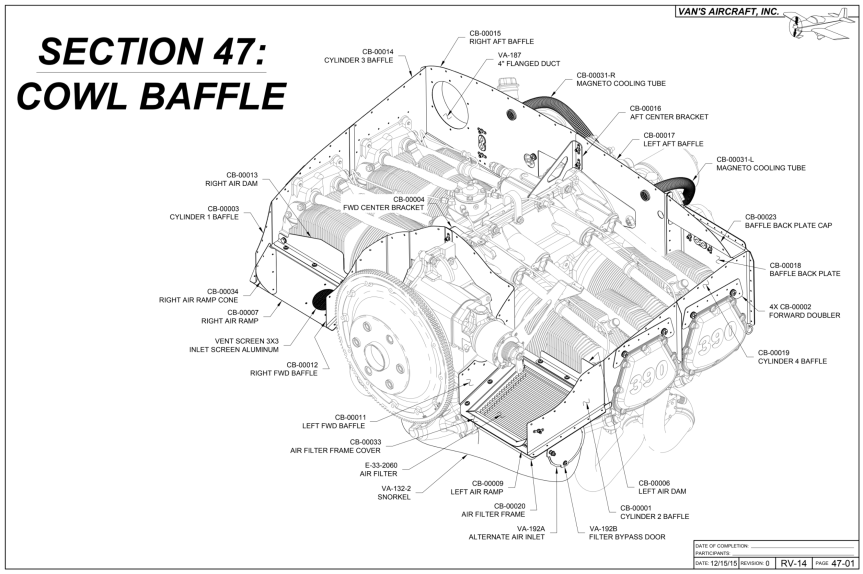
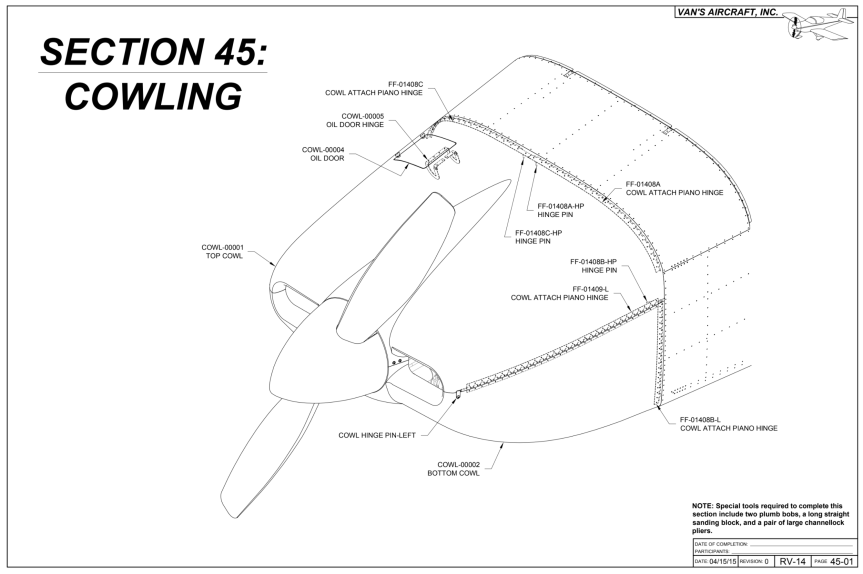
Finished installing the baffle seals on the cowling and installed the cowling back on the airplane.


I also spent some time tidying up the wiring under the panel and installing the adel clamps and wire ties on the control cables.


Today’s Time (hours): 10.0
Finish kit (hours): 323.0
Total Time (hours): 1057.0

Finished Snorkel, Installed Baffle seals, Installed control cables


Installed the alternate air door in the snorkel.


Formed the right air ramp cone and the cone in the air filter cover and installed them.


Installed the baffle seals.


Installed ignition wire pass-throughs, the blast tubes for cooling the mag/ignition, and sealed the baffles to the engine case with RTV.


Clamped the clamping strips in place on the lower cowl air inlets and filled the gaps with flox.


Installed the throttle, prop, mixture and alternate air control cables.


Today’s Time (hours): 20.0
Finish kit (hours): 313.0
Total Time (hours): 1047.0

Installed baffles and snorkle

Installed the aft baffles.. Pretty straightforward. Only thing I needed to trim was a path for the Manifold pressure line form the number 3 cylinder.


Installed the forward baffles. Also straightforward. Needed to trim a bit where the left baffle meets the case just forward of the #2 cylinder.


Decided to go with safety wire to tie the bottom of the baffles together rather than the rods. After a bit of research this seems to be a tried and true method and it’s a lot easier to install and remove.

img_4999-1


Fit and trimmed the snorkel. clecoed/bolted it all in place and bonded it to the air cleaner frame with epoxy and flox.


Connected up the SCAT tubes for the oil cooler and cabin heat.


Today’s Time (hours): 8.0
Finish kit (hours): 293.0
Total Time (hours): 1027.0

Started Cowl Baffle (Section 47)

Screen Shot 2020-06-13 at 6.34.10 PM


Picked, Inspected, and deburred all of the cowl parts.


Trimmed and deburred the cylinder baffle doublers and riveted to the cylinder baffles.


Installed nut plates and oil cooler flange and assembled aft baffles. Added strips of RTV to the mating surfaces.


Trimmed the air cleaner frame, added nut plates and fit to the inlet ramp. Assembled the left inlet ramp.


Attached the SCAT tube flange and screen for the heater air inlet to the right inlet ramp. Assembled the right inlet ramp. Added RTV strips to the mating surfaces of the inlet ramps.


Today’s Time (hours): 8.0
Finish kit (hours): 285.0
Total Time (hours): 1019.0

Completed Cowling

Drilled the screw holes on the bottom of the cowling

img_4953


Attached the inlet ramps with epoxy and flox. Filled, sanded and sealed the areas where the baffle seals will seal against the top cowl.


Installed the heat shield foil in the lower cowl and sealed the edges with epoxy.

img_4958


Today’s Time (hours): 10.0
Finish kit (hours): 277.0
Total Time (hours): 1011.0

Work on cowl continues

Match drilled the top and bottom cowls to the cowl hinges.


I disassembled the cowls, deburred all the holes in all the hinges. I coated the inside of both cowl halves with thin coating of resin to seal it all up.

img_4851


Riveted all the hinges to the cowl halves


Trimmed and sanded the fiberglass inlet ramps and fit them to the top cowl. They gat match drilled to the cowl core just deep enough to hold a cleco to clamp it in place for bonding with epoxy and flox. I didn’t get any pics of the bonding process and I put it back on the fuse to cure before I could get a shot of the finished product.


I did decide to get the oil door done once the epoxy set up sufficiently. It was a pretty straightforward process.


I reinstalled the spinner. She’s coming along!

img_4949-1


Just have to drill the attachment holes on the bottom of the cowl and blend in the inlet ramps and the cowl will be complete.


Today’s Time (hours): 14.0
Finish kit (hours): 267.0
Total Time (hours): 1001.0

Started work on cowling

screen-shot-2020-06-06-at-7.25.04-am

Another busy week at work. Didn’t even have a chance to post last weekend’s build sesh. So here it is a week late.

Fabricated and installed the cowling hinges


Trimmed the top and bottom cowling with a cut-off wheel in the Dremel and some course sandpaper on a long sanding block. Cut out the landing gear hole and the oil door.


Clamped the cowl halves together and fit, trimmed and sanded the spinner and air inlet areas. This took several iterations to fit properly.


Had to do a couple of iterations of trimming the aft edge of the top cowling to get it to fit in place. Marked the rivet locations on the cowling and drilled them. Then match drilled those holes to the cowling hinges.


Several iterations of trimming and sanding the bottom cowling aft edge, then the top edges. Marked the rivet locations and drilled them. The match drilled to the cowl hinges.


Clamped the hinges that join the top and bottom cowling in place. Layed out the rivet line and match drilled the bottom cowling to the hinges. Located and cut out the notches in the top cowling for the tabs that secures the hinge pins.


Today’s Time (hours): 12.0
Finish kit (hours): 253.0
Total Time (hours): 987.0