Started work on cowling

screen-shot-2020-06-06-at-7.25.04-am

Another busy week at work. Didn’t even have a chance to post last weekend’s build sesh. So here it is a week late.

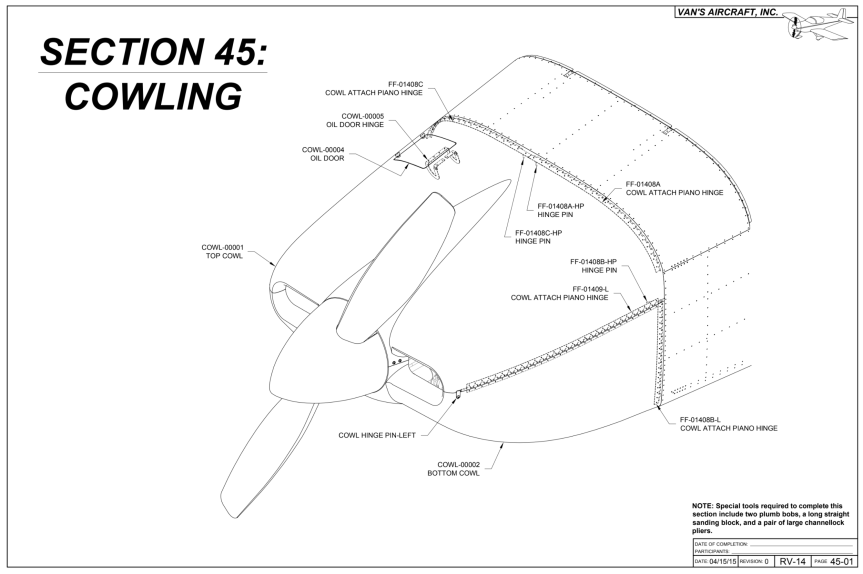
Fabricated and installed the cowling hinges


Trimmed the top and bottom cowling with a cut-off wheel in the Dremel and some course sandpaper on a long sanding block. Cut out the landing gear hole and the oil door.


Clamped the cowl halves together and fit, trimmed and sanded the spinner and air inlet areas. This took several iterations to fit properly.


Had to do a couple of iterations of trimming the aft edge of the top cowling to get it to fit in place. Marked the rivet locations on the cowling and drilled them. Then match drilled those holes to the cowling hinges.


Several iterations of trimming and sanding the bottom cowling aft edge, then the top edges. Marked the rivet locations and drilled them. The match drilled to the cowl hinges.


Clamped the hinges that join the top and bottom cowling in place. Layed out the rivet line and match drilled the bottom cowling to the hinges. Located and cut out the notches in the top cowling for the tabs that secures the hinge pins.


Today’s Time (hours): 12.0
Finish kit (hours): 253.0
Total Time (hours): 987.0

Completed the canopy fairing

More filling and sanding to eliminate low spots and pinholes.

img_4451


More filler/primer and sanding and a final coat of filler/primer and we’re done with the fairing. Finally!


This took forever but I’m happy with the result. Learned a lot about body work the hard way.    🙂

Onward!

Today’s Time (hours): 4.0
Finish Kit (hours): 93.0
Total Time (hours): 823.0


Filled and sanded the fairing

Removed the peel ply. Sanded everything to the proper shape and feathered the forward edges. Filled a few small voids with body filler and sanded everything smooth. Sprayed the skin and fairing with filler primer. The primer showed a bunch of imperfections. Sanded them out and shot another cost of primer. Looks like there are still a number of tiny voids and pin holes. I’ll sand the primer back and decide whether I need some more body filler at that point and then shoot another coat of filler primer. Overall I’m happy with the way it’s turning out considering I’ve never done body work before. Things I learned today… Body people earn their money!


Today’s Time (hours): 5.0
Finish Kit (hours): 89.0
Total Time (hours): 819.0


Work on canopy fairing continues

Sanded the rest of fairing to the proper shape and feathered the forward edge. I used 80 grit sandpaper and then a pass with 220. The shape looked really good.


I was going to shoot the fairing with some filler primer. I masked everything off and then wiped the surfaces down with some alcohol. After wiping everything down, I noticed that I had a few small voids and a couple of areas where I had sanded through to the canopy. So rather than filler primer, I decided to go with an additional layer of fiberglass. I used the “A” ply template to cut out some fiberglass cloth. I mixed up some epoxy with black pigment. I wet down the areas to be covered, applied the cloth, stippled it down, and positioned it. I also mixed up some epoxy and micro balloons and used it to fill the voids. I let it all set up for a bit then applied a top coat of epoxy and covered with peel ply.


Up next… More sanding. Yay.


Today’s Time (hours): 5.0
Finish Kit (hours): 84.0
Total Time (hours): 814.0


Started sanding the canopy fairing

This is the first substantial project I’ve done that involved laying up fiberglass. I will be more judicious in the application of epoxy in the future. I figured I’d just hit it with some 60 grit and bing, bang, boom. We’ll not so much. Sanding fiberglass is a slow messy process. Three hours in and I’ve got the basic shape on three quarters of the fairing. Still not down to the tape on the forward line. This is going to take a while.


On a brighter note. I had an awesome flight today with Jared in his RV-14A. We had lunch at KGMU and then stopped by KVPC and hung out with Wes and I went for a ride in his RV-7A. Very similar in a lot of ways to the RV-14. A bit tighter in the cockpit but by no means uncomfortable. All in all a great day!


Today’s Time (hours): 3.0
Finish Kit (hours): 79.0
Total Time (hours): 809.0


Sanded the filler and filled the low spots

Used some 60 grit sandpaper to quickly take down the filler to the profile of the canopy. There were a few low spots on the sides and voids around the canopy clips. So I mixed up a small batch of epoxy with micro and filled them in.

Today’s Time (hours): 1.0
Finish Kit (hours): 70.0
Total Time (hours): 800.0


Work resumes on the canopy

Put the canopy back on the frame and clecoed in place. Peeled back the protective plastic on the forward edge of the canopy. Used a caliper to scribe a line for the aft of the fairing. Laid two layers of electrical tape along the line and put some masking tap above it to make sure the canopy is protected as I work on the fairing. I filed the outboard edge of the canopy to reduce the profile and make for a thinner fairing.


Fabricated a little 2″ straight edge tool and used it to scribe the forward fairing line into the top skin of the canopy frame. I cut out the side templates and used a sharpie to trace the forward outboard fairing line. It didn’t quite match up with the forward line I had scribed. So I split the difference and made a nice curve when I masked off the line with the electrical tape.


Scuffed the scrap out of the masked off skin and canopy with 60 grit sand paper. Went back and did another pass after these pics. It’s scuffed!


Arts and crafts time! I cut out the paper templates for the fiberglass cloth.

img_4329


Today’s Time (hours): 2.0
Finish Kit (hours): 62.0
Total Time (hours): 792.0


Drilled the canopy

The plans have you tape the template pictured below on to the canopy skin in order to locate the canopy. Rather than ruin the one in the plans I took the time to have a couple copies made when i went out to pick up Sophie from work this morning. When I went to tape it on, I realized that the scale was off. I assumed that it was the copy until I measured the original and found that the scale was not 1:1. Thanks Van’s! Not only is it not 1:1 none of the lines on the drawing that actually matter are dimensioned. I could have gone back and had it printed at 103% but decided the whole thing was a waste of time in the first place. I used the rivet locations on the drawing to draw intersecting lines at the centerline that corresponded to the canopy line on the drawing. Then used that spot to locate the forward edge of the canopy. It worked just fine.

img_4254


Put the canopy on the frame and fiddled with it to get everything lined up evenly on both sides and aligned with the mark on the skin. Sanded down the edge where it tucks under the skin to help it lay flat. Removed and reinstalled to do the sanding. Took a couple of attempts. Inserted the shims and clecoed on  the side skins.

img_4256


Realized I didn’t have anything to weight down the front of the canopy with. Tried using a ratchet strap but didn’t like the way it looked. I couldn’t get the forward edge to lay flat. So took a ride to Cabela’s and picked up a 25lb bag of lead shot. Made up two ten-pounders and one five and taped them to the canopy. Worked like a charm.

img_4258


Triple checked that everything was properly situated and drilled all the #40 holes. I used a plexi bit on the aft section. On the sides I used a plexi bit to get through the plexi and then switched to a regular #40 bit in a second drill motor to go through the shim and side frame.

img_4259


Today’s Time (hours): 3.0
Finish Kit (hours): 44.0
Total Time (hours): 774.0


Cut, deburred, scuffed, and primed the canopy frame parts.

Cut all the parts that needed parting.


Fabricated the canopy handles from aluminum angle.

img_4181


Deburred and scuffed all the parts.

img_4184


Primed everything.


Started assembling the canopy frame. Dimpled and rivered the hinge intercostals. Dimpled the skin. Fluted and fit the substructure. Started riveting the substructure together.


Today’s Time (hours): 6.0
Finish Kit (hours): 26.5
Total Time (hours): 756.5


Completed the fuselage!

I started prepping the the fuselage for painting the rollover structure. I noticed that the flush blind rivets on the top of the canopy deck had little burrs sticking up. So I filed them off. Then the burrs were gone but I didn’t like the way they looked. So after some head scratching, I decided to fill them, and sand them, and repaint. I’ve never done any body work before and I don’t think I’ll quit my day job.   It tuned out pretty well though.

This completes the fuselage!

Today’s Time (hours): 6.0
Fuselage Time (hours): 227.5
Total Time (hours): 714.0