Started the Seat Backs (Section 39)

Screen Shot 2020-02-09 at 5.14.16 PM


Picked and inspected all the parts. Peeled off all the blue vinyl and labels.


Cut the corners off the seat back angles.

img_4275


Separated the parts that needed parting. Deburred everything.


Fabricated the seat back and seat brace hinges. Match drilled the hinges to their corresponding parts. Machine countersunk the brace stiffeners and braces. Riveted the brace assemblies together.


Riveted together the seat backs.

img_4288


I’ll scuff and paint these along with the canopy.


Today’s Time (hours): 4.0
Finish Kit (hours): 51.0
Total Time (hours): 781.0


Cut, deburred, scuffed, and primed the canopy frame parts.

Cut all the parts that needed parting.


Fabricated the canopy handles from aluminum angle.

img_4181


Deburred and scuffed all the parts.

img_4184


Primed everything.


Started assembling the canopy frame. Dimpled and rivered the hinge intercostals. Dimpled the skin. Fluted and fit the substructure. Started riveting the substructure together.


Today’s Time (hours): 6.0
Finish Kit (hours): 26.5
Total Time (hours): 756.5


Finished rear window and started on Canopy Latch

I used the edge roller to break the edge of the top and side skins where they meet the rear window. I final drilled the skins #27 and dimpled the holes for #6 screws. The squeezer wouldn’t fit into the space between the top skin and the roll bar brace. After a fair amount of ass-scratching I tried using a #6 screw and a K1000-06 nut plate to press the dimple into the center hole. It worked well.

I decided to wait until later to actually install the window. This will enable better access to the fuselage and keep me from beating up the window while I’m working on the rest of the stuff. But everything’s done and all I have to do is add some sealant and screw it in. For sealant I’ve decided to try Lexel. It’s a clear solvent based sealant that is safe for acrylic. Other builders have reported good success with it.


I separated, deburred, and painted the stiffener angles. I’ll rivet these in place as soon as the paint dries.


I picked and inspected all of the parts for the rest of the canopy.

img_4151


I peeled all of the parts for the canopy latch mechanism. I separated the peices that needed parting. I deburred and scuffer all the parts. Then painted everything to match the interior.


I test fit the canopy latch pins in the bushings that I installed in the roll bar. I realized that I neglected to mask of the bushings when I painted the roll bar and got some paint in there. I wrapped some sand paper around a brass drift and used it to clear the paint. Everything fits fine now.


Today’s Time (hours): 4.0
Finish Kit (hours): 18.0
Total Time (hours): 748.0


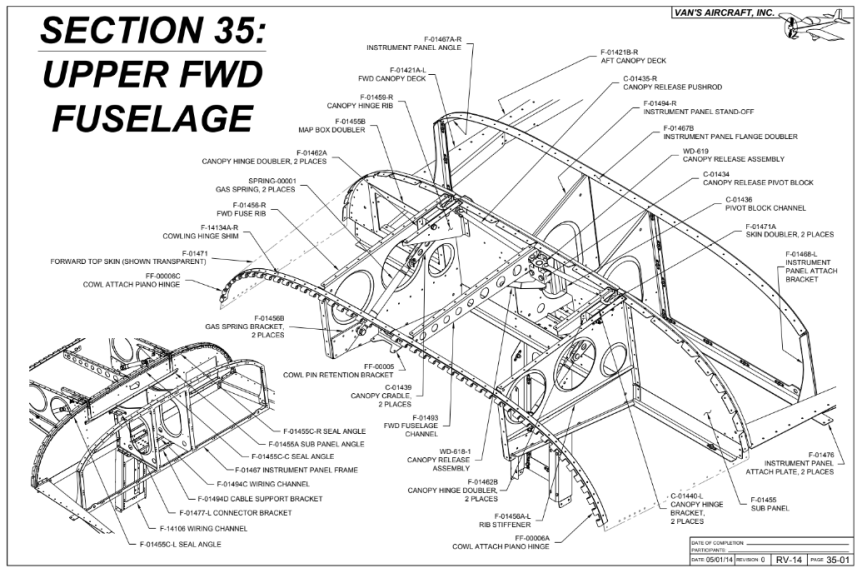
Began Work on Upper Forward Fuselage (Section 35)

Screen Shot 2019-12-07 at 11.38.33 PM


Picked, inspected, and peeled all the parts.


I separated all the parts that required parting and began fabrication. I made the canopy release pins by shortening and chamfering the ends of a couple of eye bolts. I made the canopy release push tubes from some aluminum tubing.


Today’s Time (hours): 3.0
Fuselage Time (hours): 176.0
Total Time (hours): 630.5

Completed most of the fabrication steps

In case you haven’t noticed, I’ve settled into a strategy for most sections of the build… First I pick, inspect, and peel all the parts for the section. The I take a first pass through the instructions and perform all of the steps that require cutting, grinding, bending, etc. Then I deburr, scuff, and dimple all the parts. Then I prime everything. Finally I assemble and rivet everything. I’ve found this approach is much quicker then going step by step in the order of the instructions. I can set up the shop and tools for each operation and reorganize after each operation. I kind of get into a groove with each of the operations and avoid frequent tool changes. I also only need to set up for paint, which is a major operation, once per section.

Today I was focused on fabrication steps… I started with the upper longerons. I cut and trimmed according to the plans. The fabricated a couple of clamping blocks that allowed me to secure each longeron in the bench vise and clamp a lever to the end in order to bend a 10 degree twist into them. Finally I clamped and clecoed the upper engine mount brackets to the forward end of the longerons and match drilled them.


Drilled and cut the lower longerons and match drilled them to the lower engine mount brackets and longeron doublers.


Fabricated the hinges that will attach the cowling to the firewall.

img_3549


Separated a whole bunch of parts. Unfortunately my bandsaw blade gave up the ghost early on and I didn’t have a spare. So I used the snips for the thinner aluminum and the Dremel with a cutoff wheel for the thicker parts. A little bit slower but not too bad.

img_3550


I managed to lose a part somehow. I turned the shop upside down and couldn’t find the F-01422 Fuselage Side Ribs. I checked it off on the inventory. No idea what happened to it. Ordered a new one from Van’s.


Today’s Time (hours): 5.0
Fuselage Time (hours): 80.0
Total Time (hours): 534.5


Back to work on the tanks

Got back from Toronto yesterday and my replacement tank skins had arrived. I cut the splice strips from the skins with the snips and filed/sanded the edges smooth. I clecoed the baffles into the skins and machine countersunk all the associated rivet holes.

I’ll get the dimpling done tomorrow and start assembly on Sunday.

In other news… Van’s charged my credit card for the balance due on the fuselage kit. Hopefully that means the kit is being crated and will ship in the next week or so. Now the pressure is on to finish the wings!

Today’s Time (hours): 1.0
Wing Time (hours): 190.0
Total Time (hours): 342.0


Prepared tank stiffeners

Dimpled the nut plate attach holes in the inboard tank ribs.

img_2588

Separated the stiffeners.

img_2592

Used snips to make all the cuts. Doh! Should have peeled the blue vinyl off before I cut them.

img_2593

Then cleaned them up on the scotch bright wheel, scuffed the mating surfaces and dimpled.

img_2595


Today’s Time (hours): 2.0
Wing Time (hours): 127.0
Total Time (hours): 338.0


Work continues on outboard leading edges

Deburred all the edges of all the things. The doublers for the landing light lenses looked like they were crafted by Van’s with a chainsaw. You can see the before and after shot below. I used sandpaper to work the flanges around the nose of the ribs so that the skins don’t telegraph any faceting.

Trimmed the four ribs called out in the plans so that they will fit around the spar braces. Finished with files and sandpaper.

img_2484

Flattened, straightened and fluted all the ribs. Then final drilled and deburred all the holes.

Dimpled all the holes with the squeezer.

Cut the J-channel stiffeners to length and drilled the first inboard hole in each.

img_2489

Final drilled #19 the screw holes in the splice strips. Carefully deburred the holes and dimpled for #8 screws. Dimpled all the #40 holes as well.

img_2490

In other news, I received the order confirmation for the engine I ordered at Sun ‘n Fun. The ship date from Lycoming is October 11.

series-engine-390

Today’s Time (hours): 5.0
Wing Time (hours): 94.0
Total Time (hours): 305.0

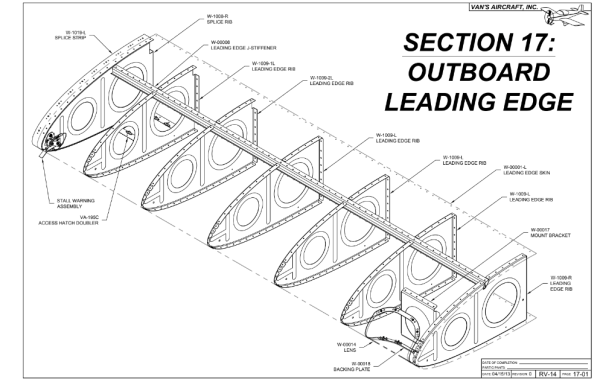
Begin work on Section 17: Outboard Leading Edge

Screen Shot 2019-04-28 at 8.15.00 PM

Picked all the parts for the leading edges. I cut the splice strips from the tank skins and trimmed the tabs from the cover plate doubler using snips.

img_2448-1

Cut out the leading edge cradles from the shipping crate top. Forgive the blur in the image… I photoshopped out my address from the top of the create.


24a83995-2937-4edc-9ffe-fe487ccdf94a

Cut the 2 x 4, glued it, and screwed it to the cradles. Clamped them to the workbench

img_2450

Off to Nashville for a conference tomorrow… Sophie said she’d prep (peel, edge deburr, and scuff) all the parts while I’m gone. So should be able to begin fabrication and fitting when I get back later in the week.

Today’s Time (hours): 2.0
Wing Time (hours): 89.0
Total Time (hours): 300.0