Completed the prop and spinner

Went flying with Jared, Wes, and Scott. Got some nice pics of Wes’s RV-7A in fingertip formation on the way to KLZU for dinner Thursday evening.

img_4758


Jared came over on Friday and helped me hang the prop. Leveraged my specialization in brute force and stupidity to turn a one hour job into a five hour epic involving a three hour journey to and from Aircraft Spruce for a new prop wrench. All’s well that ends well.

img_4776


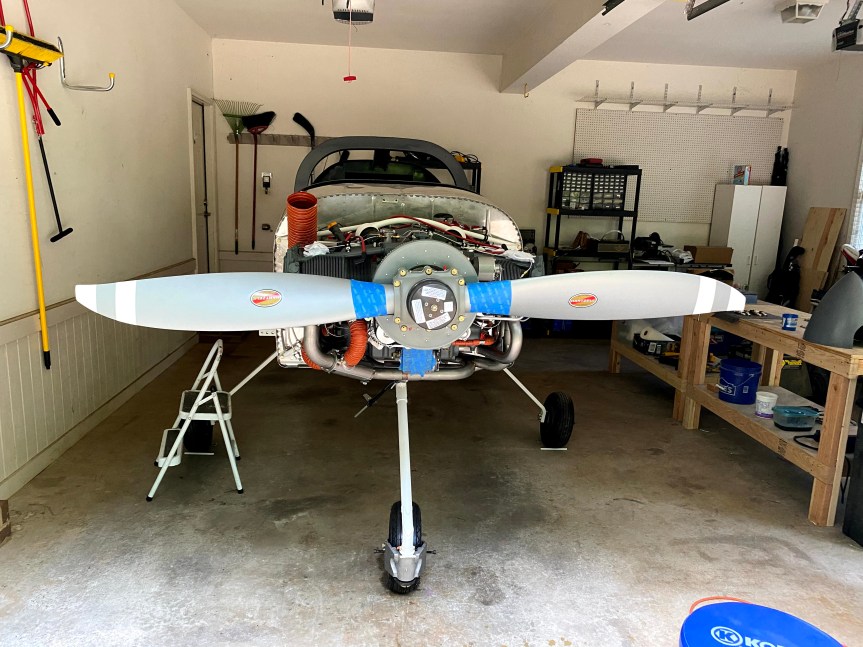
Safety-wired  the prop mounting bolts.

img_4780


Mounted and drilled the spinner, spinner plate and forward bulkhead. Used the neodymium magnets and plastic washers that came with the kit to locate the holes in the forward bulkhead.


Installed nutplates into the bulkhead and re-mounted it. Torqued and safety-wired the bolts.


Fabricated and installed the gap fillers. Clamped a couple of wooden boards to the prop blade as a lever to rotate the blades (change their pitch) in order to check the clearance of the spinner and gap filler. I used a sanding drum in an electric drill to make minor adjustments to the spinner and gap fillers. Then riveted the gap filler to the spinner plate.


Reinstalled the spinner.


Today’s Time (hours): 10.0
Finish kit (hours): 241.0
Total Time (hours): 975.0

Primed the control system parts and began assembly

Primed all the parts.

img_3948


Bolted the elevator idle arm in place.

img_3949


Assemble the stick link pushrod.

img_3950


Riveted the elevator pushrod ends into the rods and added the rod end bearings.


Bolted the forward push tube to the control column.

img_3954


Put together the elevator bell crank assembly. riveted the bell crank halves together with the flange bearing in the middle. Machine countersunk the the nut plate holes in the bell crank bracket and riveted in the nut plates. Bolted the bell crank angles to the bell crank and then to the bell crank bracket. Machine countersunk and riveted together the yaw servo bracket. The match drilled it to the the fuselage and installed the bell crank assembly together with the mid elevator push tube, pitch servo bracket, and yaw servo bracket.


Connected the forward and mid push tubes to the idler arm.

img_3961


Final rilled the control stick bases to the control sticks. The installed the bases into the control column. Bolted the stick link to the right hand stick base. I’ll bolt up the other side after I’ve checked the alignment of the sticks.

img_3962


Today’s Time (hours): 6.0
Fuselage Time (hours): 214.0
Total Time (hours): 669.5


Continued assembly and did a bit of painting

Clecoed then riveted the sub-panel assembly to the fuselage.


Riveted nut plates into the wiring channel. Painted the assembly and later installed it into the fuselage after the paint dried.


Match drilled the forward and aft canopy decks to the left and right longerons. Then dimpled the holes in the canopy decks and machine countersunk the holes in the longerons. Painted the canopy decks as well as the panel brackets and wiring supports.


Machine countersunk all the holes in the instrument panel frame. Riveted the instrument panel angles, nut plates, and flange doubler to the frame. Painted the assembly.


Ground one of the corners off of the fresh air vents to match up to the flange that connects it to the fuselage and naca duct.

img_3894


Today’s Time (hours): 5.0
Fuselage Time (hours): 189.0
Total Time (hours): 643.5

Work continues on baggage area

Fabricated the seat back hinges and match drilled to the floor skins.

img_3776


Deburred, Scuffed, and primed all of the parts.

img_3777


Dimpled the floor skins and riveted the nut plates in place.


Installed snap bushing and routed the rudder cables, static line, and ELT wire.

img_3780


Today’s Time (hours): 5.0
Fuselage Time (hours): 149.0
Total Time (hours): 603.5

Began work on Fuel System (Section 31)

Took a break from riveting the the fuselage together. Jared’s lending me his engine-stand-fuselage-rotisserie. So I’ll wait until he drops by next weekend to finish the riveting. It’ll be a lot easier if we can roll the fuselage on its side.

So… Got started on the fuel system tonight. Picked and inspected all the parts.

img_3739


Separated the fuel line brackets and riveted to the cover ribs.


Disassembled the fuel selector valve. Oriented the fittings per the plans but couldn’t screw them in because I didn’t have the Loctite 648 that the instructions called out. Ordered some from Amazon. I riveted nut plates to the flanges of the valve. Finally I machine countersunk the screw holes in the face plate.


Crimped the connectors on the leads from the fuel pump. Added thread sealant to the fuel filter fitting and screwed it into the pump. Mounted the pump and filter into the into the fuselage.


Attached the AN elbows to the firewall and fuselage sides.


Today’s Time (hours): 3.0
Fuselage Time (hours): 136.0
Total Time (hours): 590.5

Joined up the back and the front!

Dimpled the bulkheads and riveted the nut plates to them.

img_3729


Joined up the front and back and clecoed together. Starting to look very airplane-like.

img_3731


I neglected to chamfer the top aft edges of the seatbelt lugs when I did the fabrication. So did that and Machine countersunk them. Then shot them with some rattle can primer and stuck them in the vise to dry.

img_3733


Today’s Time (hours): 2.0
Fuselage Time (hours): 131.0
Total Time (hours): 585.5

Finished riveting left side

Riveted the web stiffeners to the main bulkhead webs.

img_3693


Riveted the nut plates to the root faring angles and lower skin. Then riveted the root faring angles to the left side skin


Bolted the left bulkhead bar back in placed and torqued it down.


Removed the right landing gear bracket in preparation for riveting the right side skin to the fuselage.

img_3705-1


In other exciting news, my engine arrived from Lycoming!

img_3704


Today’s Time (hours): 5.0
Fuselage Time (hours): 123.0
Total Time (hours): 577.5

Started assembling the lower skins and muffler shroud.

Dimpled the bottom skins and riveted the com antenna doublers and skin stiffeners to them. I’m only installing a single com radio so I only drilled out the right side skin for the antenna. The left side I installed some rivets to fill the starter holes. I did install the left side antenna doubler in case i want to add another radio later. I can just drill out the rivets and upsize the holes to install another antenna.


Dimpled the muffler shroud parts. Riveted the doublers and muffler hanger brackets to the shroud sides. Riveted the nut plates to the fuel pump brackets and then riveted the brackets to the shroud ramp.


Today’s Time (hours): 2.0
Fuselage Time (hours): 65.0
Total Time (hours): 519.5