Drilled the canopy

The plans have you tape the template pictured below on to the canopy skin in order to locate the canopy. Rather than ruin the one in the plans I took the time to have a couple copies made when i went out to pick up Sophie from work this morning. When I went to tape it on, I realized that the scale was off. I assumed that it was the copy until I measured the original and found that the scale was not 1:1. Thanks Van’s! Not only is it not 1:1 none of the lines on the drawing that actually matter are dimensioned. I could have gone back and had it printed at 103% but decided the whole thing was a waste of time in the first place. I used the rivet locations on the drawing to draw intersecting lines at the centerline that corresponded to the canopy line on the drawing. Then used that spot to locate the forward edge of the canopy. It worked just fine.

img_4254


Put the canopy on the frame and fiddled with it to get everything lined up evenly on both sides and aligned with the mark on the skin. Sanded down the edge where it tucks under the skin to help it lay flat. Removed and reinstalled to do the sanding. Took a couple of attempts. Inserted the shims and clecoed on  the side skins.

img_4256


Realized I didn’t have anything to weight down the front of the canopy with. Tried using a ratchet strap but didn’t like the way it looked. I couldn’t get the forward edge to lay flat. So took a ride to Cabela’s and picked up a 25lb bag of lead shot. Made up two ten-pounders and one five and taped them to the canopy. Worked like a charm.

img_4258


Triple checked that everything was properly situated and drilled all the #40 holes. I used a plexi bit on the aft section. On the sides I used a plexi bit to get through the plexi and then switched to a regular #40 bit in a second drill motor to go through the shim and side frame.

img_4259


Today’s Time (hours): 3.0
Finish Kit (hours): 44.0
Total Time (hours): 774.0


Began work on Common Fuselage Harness (Section 55)

Screen Shot 2020-01-11 at 10.07.19 PM

Ran the right side harness from the aft fuselage bulkhead all the way to the panel and pulled the wing portion of the harness out through the side skin and fastened the ground wires.

The harness from Van’s was designed for the Garmin GMU 22 magnetometer. Garmin has since come out with the GMU 11 and that is what was included in my avionics package. The GMU 11 broadcasts heading information on the CAN bus rather than the RS-232/RS-485 point-to-point topology. This requires some modifications to the harness. I teased out the 2-conductor shielded cable that carries the CAN bus from the autopilot servos in the tail to the instrument panel from the harness and rerouted it to the left wing where the GMU 11 is mounted. I will repurpose a couple of connector pins in the wing harness for this and make up a harness to wire the GMU 11 to the wing harness connector (P403). I can then reuse one of the the 2-conductor shielded cables from the P403 connector to the panel to bring the CAN bus from the left wing to the panel. I’ll use the four conductor cable to bring power, e-bus power, and ground to the GMU 11 from the power bus and ground block. All in all this is a huge pain in the ass and required a lot of head scratching. I wish Van’s kept up with the state of the Garmin offerings. Even if they can’t update the harness, at least cover it in the instructions.

I managed to get all of th snap bushings in place. I added a few tie wraps as well. I’m thinking I’d like the harness to be more secure between the spar and the aft fuselage bulkhead. Looks like there’s opportunity for the elevator push tubes to rub the harness. I’ll work on that once I’ve got all the wires run.


I haven’t run the control stick harness through the cover ribs yet. Looks like the holes require some filing to fit the connectors through. Thanks again Van’s. Perhaps the plans could have called this out prior to installing the ribs. Very tight spaces to work in. That will be tomorrow’s project.


Today’s Time (hours): 3.0
Options and Miscellanea Time (hours): 41.0
Total Time (hours): 730.0


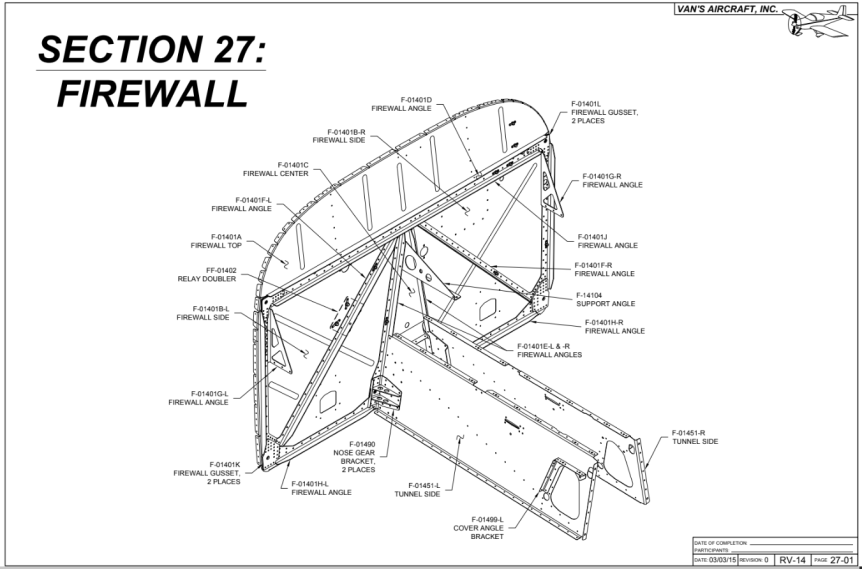
Began work on Firewall (Section 27)

Screen Shot 2019-09-25 at 7.35.54 PM


Picked and inspected all the firewall parts.

img_3391

Ordered my Finish and Firewall Forward kits. I also ordered the nose gear wheel (WHLNW511.25) and axle (WHLAXLE24) from Matco and deleted them from the finish kit. The wheel that comes with the kit apparently has the valve stem positioned in a way that there is insufficient clearance to put a cap on the Schraeder valve. Not a huge deal but figured I might as well. You can read Tim Olson’s blog for a writeup on why I’m replacing the stock setup. Jared tipped me off to this issue when we were at the Matco booth at AirVenture. So nice to have folks that have already tread the same ground!

The nice folks at Matco new what I was up to and reached out to ask if I was building an RV-14 and let me know that I would also need the spacer kit with the axle (WHLA24SPKIT).


Today’s Time (hours): 1.0
Fuselage Time (hours): 46.0
Total Time (hours): 500.5


Received fuselage kit and avionics

Very busy inventorying all the new parts. I’ll complete the wings before I get started on the fuselage but want to get it all inventoried.


I also received my avionics order. Going with a Garmin G3X Touch system with a GTN 625 Navigator, a G5 for backup PFD, and a 200B com radio. I bought it from Gulf Coast Avionics.

img_2974


Today’s Time (hours): 4.0
Wing Time (hours): 260.0
Total Time (hours): 412.0


Riveted rear spars to ribs

Riveted the rear spars to the wing ribs. I tried to use the squeezer but it was cumbersome with several different rivet sizes and with the flanges in the way. So I switched to the gun. This was much easier.

img_2382


And of course, no section is complete without a few mistakes. I used the wrong size rivets in ribs behind the doublers. I used 4-4’s and needed 4-5’s the shop heads were too thin to be acceptable. So I drilled them all out. Nine rivets in total. I couldn’t punch the rivets out because there was nothing to back them up when I hit them with the punch. So I had to drill them all the way out. I was super careful but the holes are enlarged ever so slightly. If this wasn’t a critical structure, I’d probably just re-rivet it but this area carries the load from the ailerons and flaps. So I’ll go with a larger river to ensure structural soundness. I order some -5 rivets, a #21 drill, and a 5/32″ rivet set from Spruce.

img_2383


I also put in an order with Van’s for some fuel tank sealant.


Today’s Time (hours): 2.0
Wing Time (hours): 69.0
Total Time (hours): 280.0

Ordered Fuselage Kit

I sent Van’s an email with the order form for my fuselage kit. Lead times are up to 12 weeks and I seem to be moving right along with the wing kit. I included the the following items with the order:

  • RV-14 ELT INSTALLATION KIT (14 ELT ACK-04 KIT)–Qty. 1
  • RV-14 Flap Position Sensor Kit (14 FLAP POSITION KIT)–Qty. 1
  • T 14 AP Servo Install Kit Optional (14 GARMIN AP SERVO INSTALL KIT)–Qty. 1
  • Garmin Yaw Servo Install Kit(14 G3X YAW SERVO INSTALL KIT)–Qty. 1
  • Left Control Stick w/Grip-14(CS-00008T-L)–Qty. 1
  • Right Control Stick w/Grip-14(CS-00008T-R)–Qty. 1
  • Blank L-R instrument panel-14(F-00111)–Qty. 2
  • Blank center panel-14(F-00112)–Qty. 1
  • CANOPY HARNESS KIT RV-14(ES WH-00126 KIT)–Qty. 1
  • Main Harness 14 W/Phono Jack(ES WH-00125 KIT)–Qty. 1


  • Please delete from the Fuselage kit order the left and right control sticks (CS-00008-L and CS-00008-R) since they will be replaced by the control sticks ordered above.

Fixed the right aileron hinge and riveted to rear spar

Did some flying with Jared today in his RV-14A. Awesome day dancing around some scattered clouds and some fun aerobatics. Thanks for the great flight today, Jared! The aerobatic training is definitely paying off. Sorry no pics. I was having too much fun!

Meanwhile back at the airplane factory…

Received the replacement parts from vans and did the little bit of fabrication necessary to prepare the doublers and attach brackets.

img_2369

Deburred and primed the new parts with SEM rattle can primer. Riveted the attach brackets to the hinge.

img_2372


Riveted the hinge and doublers to the right rear spar.

img_2373


The mistake cost me $45 in parts and an hour and a half of build time.

img_2376


Got my new 3/8″ reamer from McMaster Carr. Used it in the drill press to precisely size the rear spar attach holes. The twisted flutes cut like butter.

img_2380


Clecoed the rear spars to the wing ribs. Ready to rivet tomorrow.

img_2381


Today’s Time (hours): 2.0
Wing Time (hours): 67.0
Total Time (hours): 278.0

Primed and started riveting the rear spar and Ordered Engine and Prop

Had an awesome time at Sun N Fun with Jared, Wes, and the Family. That’s me ordering an engine and prop in Van’s tent! And that’s me and Remy sitting in the RV14 at Van’s booth. Suddenly this is getting more real.


We got back from Lakeland this morning and I got right back to work. No rest for the wicked! Primed the rear spars and all of their associated parts.

img_2350


Clecoed the aileron hinges together.

img_2351


…and riveted them.

img_2352

Clecoed the spars together.

img_2353

Started riveting the doublers to the spars with the squeezer.

img_2354


Today’s Time (hours): 3.0
Wing Time (hours): 63.0
Total Time (hours): 274.0

Completed Inventory

I completed the inventory with all the small parts and bags of hardware and rivets. I was missing two items: FL-1006, a bundle of 4 doublers for the flaps, and Bag 3010-1. I did however receive two bags 3011-1. So I’m guessing there was a picking error since the items extra item number was consecutive to the missing one. The FL-1006 bundle was part of a sub-kit. All the other parts were in the sub-kit except for that one. I emailed Van’s. I’m sure they’ll send those items right along.

img_2188


Met up with the gang at the EAA Chapter 268 meeting out at PUJ this morning and then did some flying with Jared in his RV-14A. We flew up to GMU for lunch with Adam and Ryan, a couple of nice young guys working on their ratings at PDK. Here’s an air to air pic of them in their school’s arrow on the way back to PDK.

Thanks for the stick time, Jared!

img_2187


Today’s Time (hours): 3.0
Wing Time (hours): 6.0
Total Time (hours): 217.0


Dimpled top side skins and aft deck

Dimpled the top side skins. I used the squeezer for most of the holes and the DRDT-2 for the ones the squeezer couldn’t reach.

IMG_1998-1

I clecoed the side skin on. And I actually remembered to peel the rivet lines this time.

IMG_1995-1

I dimpled the F-01409 frame.

IMG_1996-1

And the aft deck.

IMG_1997-1

I clecoed the aft deck, F-01409 frame in place along with the Horizontal Stab Attach Bar Support Angle and deck angle. I clamped the attach bar to the support angle and match drilled. I also match drilled the deck angle to the aft bulkhead.

IMG_1999

I dimpled the cover plates for #6 screws as well. Then I realized for the first time that the cover plates are not symmetrical. <moan> And of course one is now dimpled the wrong way and primed on the wrong side. I went to order a new one from Van’s web site only to find that F-14112 does not exist in their parts inventory and it’s an hour after closing time. Oh well. I’ll call the tomorrow. No big rush given that I’m almost out of parts and my wing kit isn’t scheduled to ship for more than a month.

IMG_2002

Today’s Time (hours): 2.5
Empennage Time (hours): 177.0
Total Time (hours): 177.0