Work on cowl continues

Match drilled the top and bottom cowls to the cowl hinges.


I disassembled the cowls, deburred all the holes in all the hinges. I coated the inside of both cowl halves with thin coating of resin to seal it all up.

img_4851


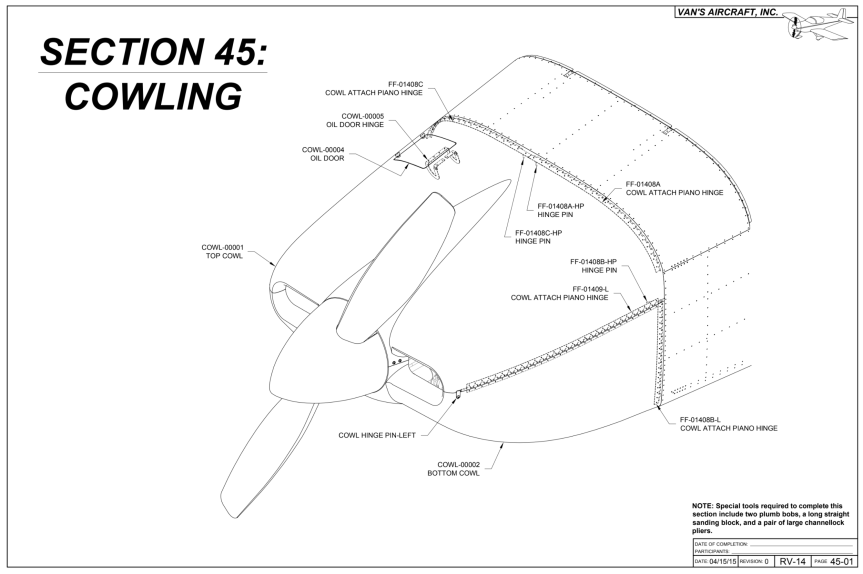
Riveted all the hinges to the cowl halves


Trimmed and sanded the fiberglass inlet ramps and fit them to the top cowl. They gat match drilled to the cowl core just deep enough to hold a cleco to clamp it in place for bonding with epoxy and flox. I didn’t get any pics of the bonding process and I put it back on the fuse to cure before I could get a shot of the finished product.


I did decide to get the oil door done once the epoxy set up sufficiently. It was a pretty straightforward process.


I reinstalled the spinner. She’s coming along!

img_4949-1


Just have to drill the attachment holes on the bottom of the cowl and blend in the inlet ramps and the cowl will be complete.


Today’s Time (hours): 14.0
Finish kit (hours): 267.0
Total Time (hours): 1001.0

Started work on cowling

screen-shot-2020-06-06-at-7.25.04-am

Another busy week at work. Didn’t even have a chance to post last weekend’s build sesh. So here it is a week late.

Fabricated and installed the cowling hinges


Trimmed the top and bottom cowling with a cut-off wheel in the Dremel and some course sandpaper on a long sanding block. Cut out the landing gear hole and the oil door.


Clamped the cowl halves together and fit, trimmed and sanded the spinner and air inlet areas. This took several iterations to fit properly.


Had to do a couple of iterations of trimming the aft edge of the top cowling to get it to fit in place. Marked the rivet locations on the cowling and drilled them. Then match drilled those holes to the cowling hinges.


Several iterations of trimming and sanding the bottom cowling aft edge, then the top edges. Marked the rivet locations and drilled them. The match drilled to the cowl hinges.


Clamped the hinges that join the top and bottom cowling in place. Layed out the rivet line and match drilled the bottom cowling to the hinges. Located and cut out the notches in the top cowling for the tabs that secures the hinge pins.


Today’s Time (hours): 12.0
Finish kit (hours): 253.0
Total Time (hours): 987.0

Started the Seat Backs (Section 39)

Screen Shot 2020-02-09 at 5.14.16 PM


Picked and inspected all the parts. Peeled off all the blue vinyl and labels.


Cut the corners off the seat back angles.

img_4275


Separated the parts that needed parting. Deburred everything.


Fabricated the seat back and seat brace hinges. Match drilled the hinges to their corresponding parts. Machine countersunk the brace stiffeners and braces. Riveted the brace assemblies together.


Riveted together the seat backs.

img_4288


I’ll scuff and paint these along with the canopy.


Today’s Time (hours): 4.0
Finish Kit (hours): 51.0
Total Time (hours): 781.0


Work continues on baggage area

Fabricated the seat back hinges and match drilled to the floor skins.

img_3776


Deburred, Scuffed, and primed all of the parts.

img_3777


Dimpled the floor skins and riveted the nut plates in place.


Installed snap bushing and routed the rudder cables, static line, and ELT wire.

img_3780


Today’s Time (hours): 5.0
Fuselage Time (hours): 149.0
Total Time (hours): 603.5

Riveted bottom skins

Jared came over and helped me rivet the bottom skins. Thanks again! I neglected to take any pictures. Imagine the picture below with rivets where all the clecos are. Had to remove and reinstall the landing gear brackets to get all the rivets in.

img_3606-1


Installed the control column.

img_3616


Temporarily clecoed the side skins in place.


Temporarily bolted the upper and lower longerons to the firewall assembly and match drilled the cowling attach hinges and the longerons.


Today’s Time (hours): 7.0
Fuselage Time (hours): 101.0
Total Time (hours): 555.5

Completed most of the fabrication steps

In case you haven’t noticed, I’ve settled into a strategy for most sections of the build… First I pick, inspect, and peel all the parts for the section. The I take a first pass through the instructions and perform all of the steps that require cutting, grinding, bending, etc. Then I deburr, scuff, and dimple all the parts. Then I prime everything. Finally I assemble and rivet everything. I’ve found this approach is much quicker then going step by step in the order of the instructions. I can set up the shop and tools for each operation and reorganize after each operation. I kind of get into a groove with each of the operations and avoid frequent tool changes. I also only need to set up for paint, which is a major operation, once per section.

Today I was focused on fabrication steps… I started with the upper longerons. I cut and trimmed according to the plans. The fabricated a couple of clamping blocks that allowed me to secure each longeron in the bench vise and clamp a lever to the end in order to bend a 10 degree twist into them. Finally I clamped and clecoed the upper engine mount brackets to the forward end of the longerons and match drilled them.


Drilled and cut the lower longerons and match drilled them to the lower engine mount brackets and longeron doublers.


Fabricated the hinges that will attach the cowling to the firewall.

img_3549


Separated a whole bunch of parts. Unfortunately my bandsaw blade gave up the ghost early on and I didn’t have a spare. So I used the snips for the thinner aluminum and the Dremel with a cutoff wheel for the thicker parts. A little bit slower but not too bad.

img_3550


I managed to lose a part somehow. I turned the shop upside down and couldn’t find the F-01422 Fuselage Side Ribs. I checked it off on the inventory. No idea what happened to it. Ordered a new one from Van’s.


Today’s Time (hours): 5.0
Fuselage Time (hours): 80.0
Total Time (hours): 534.5


Completed Forward Fuselage Lower Structure (Section 28)

Applied a bead of tank sealant to the bottom flanges of the muffler shroud sides and riveted them to the forward skins. Riveted the muffler shroud ramp to the sides and added a fillet of sealant to the bottom of each seam.


Positioned the firewall assembly on the forward skins and muffler shroud. Added sealant between the skins and firewall and around the curved area where the muffler shroud connects to the firewall and clecoed everything together. Riveted the cover bases to the skin. Riveted the curved part of the firewall to the muffler shroud sides and ramp.


Riveted the firewall angle to the firewall and skins. Dimpled the cowl places and shims and riveted them in place.


Riveted the tunnel sides to the skins and muffler shroud.


Riveted the routing bracket and fuel selector bracket in place.

img_3453


Riveted and bolted to forward center section bulkhead to the tunnel side. Riveted the skins to the cover ribs.


Sealed and screwed the firewall penetration fittings to the firewall.

img_3458


Fabricated and assembled the cabin heat vent assemblies. Then riveted them in place on the firewall along with their control cable brackets.


Machine countersunk the battery box attach holes and riveted it to the firewall.


Dimpled the cover panel and riveted it to the forward flanges of the cover ribs along with a gazillion nut plates.


Forward Fuselage Lower Structure… Done! On to the side structures!


Today’s Time (hours): 8.0
Fuselage Time (hours): 73.0
Total Time (hours): 527.5


Assembled Trim Tab

Bought a 3/4″ MDF panel at Home Depot. Leveled it out on the bench and shimmed the dead spaces with sheets of paper to create a flat surface.

IMG_1794

Prepped the skins, spar, and trailing edge with isopropyl.  Mixed up a small batch of fuel tank sealant and put a thin layer on each side of the trim tab ribs and set them in place. I used the 3M VHB tape on both sides of the trailing edge. Used clecos to align it with the bottom skin and set it in place. Then I clecoed the top skin in place along the spar and trailing edge. I peeled the paper from the VHB tape between the top of the trailing edge and the top skin removing clecos as I went to avoid tearing the paper. I replace the clecos to clamp the whole sandwich together while the tape sets up.

IMG_1795

The sealant is ridiculously sticky and smells like ass.

IMG_1796

I riveted the top skin and hinge to the spar.

IMG_1797

All done!

IMG_1798

Weighted down the skin with a board and some 2×4’s to ensure contact between the skins and the ribs until the sealant sets up. The spec sheet says there is a 6 hour cure time for the B 1/2 sealant I used.

IMG_1799


Today’s Time (hours): 1.5
Empennage Time (hours): 101.5
Total Time (hours): 101.5