

Picked, inspected, and peeled all the part.


Cut apart all the parts that needed to be separated.


| Today’s Time (hours): | 2.0 |
| Fuselage Time (hours): | 55.5 |
| Total Time (hours): | 510.0 |

Picked, inspected, and peeled all the part.
Cut apart all the parts that needed to be separated.
| Today’s Time (hours): | 2.0 |
| Fuselage Time (hours): | 55.5 |
| Total Time (hours): | 510.0 |
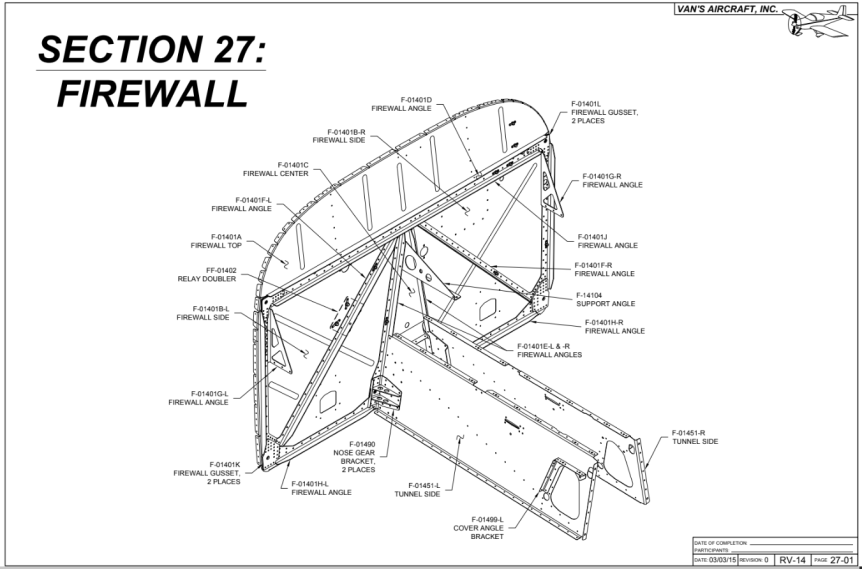
Dimpled the firewall sides.

Machine countersunk the firewall angles to mach the dimples in the firewall. Unfortunately I got distracted and neglected to tape off the holes I wasn’t supposed to countersink in the diagonal firewall angles. So two new additions to the scrap pile. New parts ordered. Moving on to the next section in the meantime…

Before moving on to the next section, I was able to dimple the firewall top section and countersink the associated angle as well the relay doubler.


| Today’s Time (hours): | 2.0 |
| Fuselage Time (hours): | 53.5 |
| Total Time (hours): | 508.0 |
Primed all the aluminum firewall parts.

Machine countersunk the firewall angles and riveted on the support angle.


Dimpled the tunnel sides and riveted the nutplates to the top flanges. Dimpled the cover angle brackets and riveted nutplates to the top flanges. Then riveted the brackets to the tunnel sides. Riveted the nose gear brackets and firewall angles to the tunnel sides.


| Today’s Time (hours): | 3.0 |
| Fuselage Time (hours): | 51.5 |
| Total Time (hours): | 506.0 |
Scuffed all the aluminum parts. Ready to prime.

| Today’s Time (hours): | 0.5 |
| Fuselage Time (hours): | 48.5 |
| Total Time (hours): | 503.0 |
Peeled all the parts. Cut apart the parts that needed to be separated. Deburred all the edges.


| Today’s Time (hours): | 2.0 |
| Fuselage Time (hours): | 48.0 |
| Total Time (hours): | 502.5 |
Picked and inspected all the firewall parts.

Ordered my Finish and Firewall Forward kits. I also ordered the nose gear wheel (WHLNW511.25) and axle (WHLAXLE24) from Matco and deleted them from the finish kit. The wheel that comes with the kit apparently has the valve stem positioned in a way that there is insufficient clearance to put a cap on the Schraeder valve. Not a huge deal but figured I might as well. You can read Tim Olson’s blog for a writeup on why I’m replacing the stock setup. Jared tipped me off to this issue when we were at the Matco booth at AirVenture. So nice to have folks that have already tread the same ground!
The nice folks at Matco new what I was up to and reached out to ask if I was building an RV-14 and let me know that I would also need the spacer kit with the axle (WHLA24SPKIT).
| Today’s Time (hours): | 1.0 |
| Fuselage Time (hours): | 46.0 |
| Total Time (hours): | 500.5 |
Tammi helped me to rivet the bottom skin to the baggage ribs.

Riveted the baggage floor stiffener and outboard rib in place.


| Today’s Time (hours): | 1.5 |
| Fuselage Time (hours): | 45.0 |
| Total Time (hours): | 499.5 |
Riveted the step weldment and step rib to the baggage ribs and riveted the nut plates to the weldments.


Clecoed then riveted the baggage ribs to the aft bulkhead.


Ready to rivet the skin to the baggage ribs.

| Today’s Time (hours): | 3.0 |
| Fuselage Time (hours): | 43.5 |
| Total Time (hours): | 498.0 |
Tammi helped me to rivet the bottom skin to the seat ribs. This was her first experience riveting. She’s a natural!

Riveted the power outlet bracket to the center ribs.

Blind riveted the seat rib angles to the seat ribs.


Dimpled and fluted the baggage ribs.

Final drilled and machine countersunk the step attach weldment. Dimpled the step attach angles and riveted them to the weldments.


Riveted the weldments to the outboard baggage ribs.

Dimpled the step attach ribs and riveted the doublers and nut plates to them.

Riveted the step attach ribs to the outboard baggage ribs.

| Today’s Time (hours): | 3.5 |
| Fuselage Time (hours): | 40.5 |
| Total Time (hours): | 495.0 |
Dimpled the bottom skin. Today’s word of the day: unwieldy.


Riveted the doublers and stiffeners to the bottom skin.


Dimpled the gear brace bracket and machine countersunk the gear brace bars. Riveted the gear brace assembly together and then riveted it to the skin.


Clamped the lower fuselage substructure to the bench and clecoed the skin to it. Ready for riveting.


| Today’s Time (hours): | 6.0 |
| Fuselage Time (hours): | 37.0 |
| Total Time (hours): | 491.5 |
