Started assembling canopy frame

Riveted together the canopy handle and aft canopy frame.


Machine countersunk the side rails forward rails. Dimpled the side skins, the forward top skin, and the support flanges.


Clecoed the skins and forward rails to the substructure and reinstalled the forward and mid fixtures to the bottom.

img_4234


Today’s Time (hours): 2.0
Finish Kit (hours): 35.0
Total Time (hours): 765.0


Work on canopy frame continues

Riveted the rail bases to the forward canopy frames. Clecoed the skins and splice plates to the frame along with the rails. Clecoed the forward and aft fixtures to the bottom of the forward canopy frame.  Carefully leveled everything and checked for twist in the structure. Rolled a curve into each end of the canopy frame closeout and clecoed it in place. Match/final drilled the closeout.


Machine countersunk the aft ends of the canopy rail flanges. Fluted the canopy rail angles and match/final drilled. These are thick aluminum. Glad I ate my Wheaties this morning. Machine countersunk the holes in the bottom of the angles. Then riveted the flanges to the angles. The plans called for dome head rivets with the shop heads set into the countersinks on the bottoms of the angles achieving a near-flush shop head.


Bent aft half of the rails to match the curve of the fuselage. Match/final drilled the rails to the angles. You’ll note the tape on the clecos. The plans have you cleco everything together through the matched holes. Then add clecos as you match drill each additional holes. Then go back and remove the original clecos and final drill those holes. So the tape was a reminder as to which were the original clecos. Machine countersunk the holes in the rails called out in the plans and riveted the rails to the angles.


Clecoed and final drilled the skins to the rails. Match drilled the canopy handle to the assembly as well.

img_4207-1


Clecoed the the rail assemblies to the forward canopy frame assembly and final drilled.

img_4208-1


Disassembled everything.

img_4209


My Back-ordered nose gear leg showed up today. Still waiting on the mains. Fedex delivered package 2 of 2 but not 1 of 2. Hopefully it will show up tomorrow. Fedex tracking says it’s in Forest Park. Not sure why given that it was in Kennesaw with the other package last night.

img_4195


Today’s Time (hours): 6.5
Finish Kit (hours): 33.0
Total Time (hours): 763.0


Cut, deburred, scuffed, and primed the canopy frame parts.

Cut all the parts that needed parting.


Fabricated the canopy handles from aluminum angle.

img_4181


Deburred and scuffed all the parts.

img_4184


Primed everything.


Started assembling the canopy frame. Dimpled and rivered the hinge intercostals. Dimpled the skin. Fluted and fit the substructure. Started riveting the substructure together.


Today’s Time (hours): 6.0
Finish Kit (hours): 26.5
Total Time (hours): 756.5


Finished canopy latching mechanism

Installed the lever and latch. I had to spend a bit of time finessing the lever to get it to sit properly when retracted into the skin. As it came, I kinda stuck out at the end. The scotch-bright wheel took care of the problem. Also note that yesterday I had painted these parts. That was before I realized that there was an interference fit and they were just going to get messed up anyway. So I unpainted them today with some lacquer thinner.

Installed the bell crank brackets and bell cranks. Installed the torque tube, pins, and pushrod.

On to the actual canopy next.


Today’s Time (hours): 2.0
Finish Kit (hours): 20.0
Total Time (hours): 750.0


Finished rear window and started on Canopy Latch

I used the edge roller to break the edge of the top and side skins where they meet the rear window. I final drilled the skins #27 and dimpled the holes for #6 screws. The squeezer wouldn’t fit into the space between the top skin and the roll bar brace. After a fair amount of ass-scratching I tried using a #6 screw and a K1000-06 nut plate to press the dimple into the center hole. It worked well.

I decided to wait until later to actually install the window. This will enable better access to the fuselage and keep me from beating up the window while I’m working on the rest of the stuff. But everything’s done and all I have to do is add some sealant and screw it in. For sealant I’ve decided to try Lexel. It’s a clear solvent based sealant that is safe for acrylic. Other builders have reported good success with it.


I separated, deburred, and painted the stiffener angles. I’ll rivet these in place as soon as the paint dries.


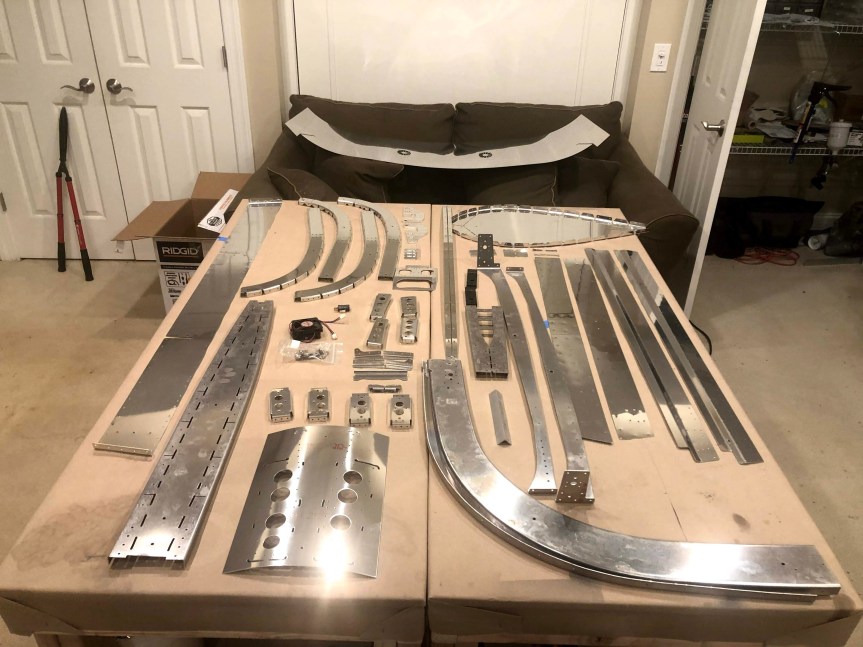
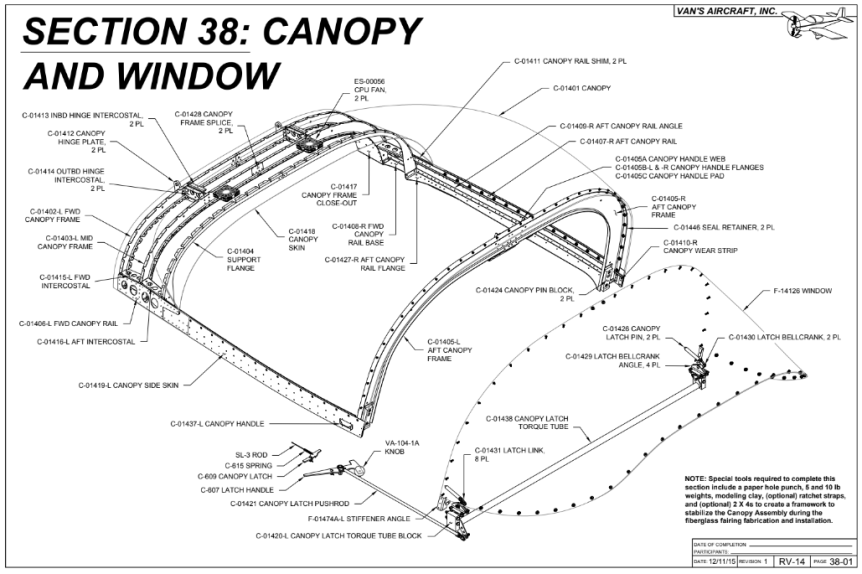
I picked and inspected all of the parts for the rest of the canopy.

img_4151


I peeled all of the parts for the canopy latch mechanism. I separated the peices that needed parting. I deburred and scuffer all the parts. Then painted everything to match the interior.


I test fit the canopy latch pins in the bushings that I installed in the roll bar. I realized that I neglected to mask of the bushings when I painted the roll bar and got some paint in there. I wrapped some sand paper around a brass drift and used it to clear the paint. Everything fits fine now.


Today’s Time (hours): 4.0
Finish Kit (hours): 18.0
Total Time (hours): 748.0


Drilled and countersunk rear window

I ground a #40 drill bit to a sharp point. I used this to drill the plastic without any cracking. I used light to moderate pressure on the drill and let the bit do the work. It took 6 to 8 seconds or so to drill each hole. For the holes on the roll bar, I chucked a regular #40 bit in another drill. I used the pointy one to drill through the plexi then switched to the other drill for the metal. I carefully started the bit; turning it by hand until I was certain it was on the metal and wasn’t going to grab the plexi. Worked like a charm.

img_4140


I final drilled #36 the holes in the forward edge of the plexi and roll bar with a regular bit. Had no problems with the bit catching the plexi after drilling with the #40 initially. I tapped the both the plexi and the roll bar for #6-36 screws per the plans. I think the plans have you tap both the plexi and the roll bar together despite the fact that we’ll final drill the plexi to #27 in the next step to help ensure good hole registration. This should help to avoid any pressure on the plexi when it is screwed down that might cause cracks later. After drilling and tapping each hole, I lightly set a crew in the hole before moving on to the next.


I placed some tape along the forward edges where the protruded beyond flush with the window shim to mark it for trimming. I removed the window from the fuselage and Final drilled #27 with a plexi bit and countersunk all the holes in the plexi using a zero-flute countersink. This gave nice smooth countersinks. I used a vixen file to carefully trim the forward edge back about 1/32 in a couple of spots and smooth everything out. I used the edge of a pare of scissors to put a bevel back on the inner and outer edges where I had filed and then finished with 400 and 1000 grit sand paper.


Today’s Time (hours): 4.0
Finish Kit (hours): 14.0
Total Time (hours): 744.0


Began work on Canopy and Window (Section 38)

Screen Shot 2020-01-16 at 11.26.43 PM


I clamped the rear window in place and carefully adjusted until it was properly centered. I marked it for cutting. I cut the two notches for the roll bar brace brackets with the Dremel and a cutoff wheel. I cleaned it up a bit with files. I trimmed back the protective plastic and remounted and clamped in place. I had to trim a bit further to get the window flush with the window shim on the roll bar. I just filed it back a bit. Ready for drilling.


Today’s Time (hours): 3.0
Finish Kit (hours): 10.0
Total Time (hours): 740.0


Completed Common Fuselage Harness (Section 55)

Installed the pilot and copilot headset jacks. Installed the music jack and the power jack. I ran the pilot’s control stick wires.


That’s a whole bunch of wires. Terminating all of them should be fun!

img_4122


Today’s Time (hours): 2.0
Options and Miscellanea Time (hours): 48.0
Total Time (hours): 737.0


More wiring

Run the left side of the main harness. Terminated the antenna connections; TNC for the GPS and BNC for the com and transponder. Only did the antenna side. I’ll get the panel end when I wire the panel.


Getting the snap bushings into the wire guides was a huge pain in the ass. super tight. especially with the additional can bus wire. I ended up pulling that wire out and getting the snap bushings in. Once they were in I was able to push the can bus cable through.

img_4109


On a brighter note, my seats came in today. Abby at Flightline Interiors did an amazing job. Very happy.

img_4107


Today’s Time (hours): 2.0
Options and Miscellanea Time (hours): 46.0
Total Time (hours): 735.0