A little drilling, a little dimpling, a little riveting.

Reassembled the nose skin and match drilled the remaining #40 holes form the skin into the the counterbalance tubes. Then upsized them to #30.

img_2761


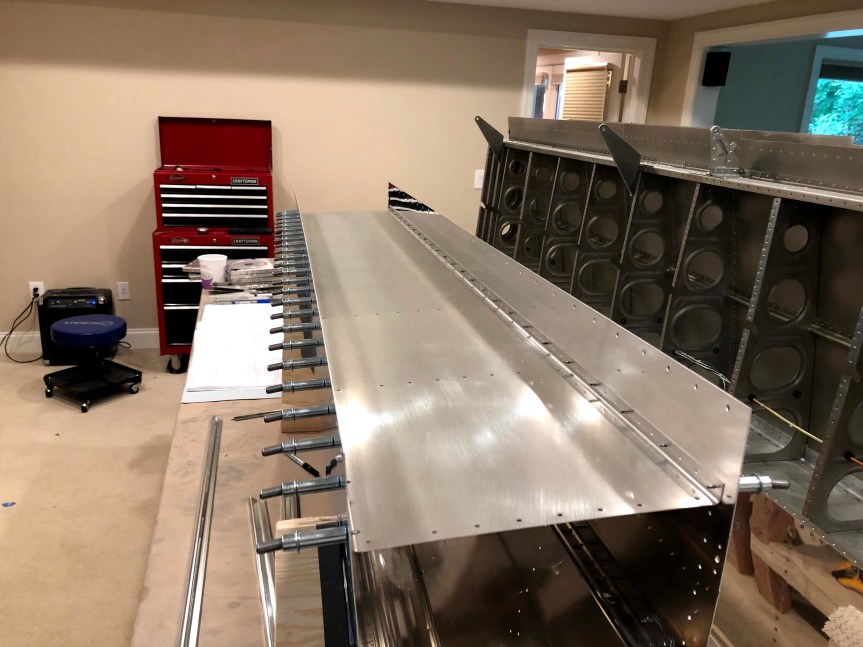
Dimpled the skins for the stiffeners and ribs.

img_2762

Started back riveting the stiffeners to the skins. After riveting the first one I realized that I neglected to trim them to the correct length. It was obvious that they would interfere with the trailing edge extrusion. I’m guessing that the stiffeners are another shared part with the RV-10 thus requiring shortening for the RV-14.

I was able to trim the one I riveted with a cutoff wheel on the Dremel by sliding a thin piece of scrap aluminum under the stiffener to protect the skin. I deburred it with sandpaper. No harm No foul. I trimmed the rest on the bandsaw and deburred on the ScotchBrite wheel.

Had to quit to go watch the Bruins in game 7 of the Stanley Cup Final.


Today’s Time (hours): 2.0
Wing Time (hours): 177.0
Total Time (hours): 389.0


Primed everything and started assembly

Primed all the aileron parts.


Riveted the various hinges and doublers to the various ribs.

img_2751


Clecoed the nose ribs to the spars and set in the skins with the stainless counterbalance tubes. Match drilled the inboard and outboard holes from the leading edge of the skins to the counterbalance.


Today’s Time (hours): 4.0
Wing Time (hours): 175.0
Total Time (hours): 387.0


Fitting the flaps together

Assembled the inboard and outboard rod end ribs. Clecoed the ribs and doubles together. Match drilled the #40 holes and final drilled the 1/4″ hole. Countersunk the #40 holes on the outboard doublers.


Clecoed the ribs to the flap hinges and final drilled all the #30 holes.

IMG_2681


Modified all the main ribs by removing the top forward tab from each with the Dremel and a cutoff wheel. Finished with a bit of sanding to remove the burrs.

IMG_2683


Assembled the flap substructures.

IMG_2684


Trimmed the inboard and outboard trailing edges to final size with the bandsaw and finished on the scotch brite wheel.


Clecoed the flaps together.


Match drilled the two top holes in each of the nose ribs. I also final drilled all of the holes in the trailing edges.

img_2693


Assembled the hardware in the hinge to hold everything in alignment and match drilled the four holes in the  trailing edge of the hinge.

img_2692

Disassembled everything.

img_2694

Next I need to machine countersink the holes in the trailing edge wedge and the holes I just drilled in the hinges. Then dimple and prime everything.

Today’s Time (hours): 6.5
Wing Time (hours): 152.5
Total Time (hours): 363.5


Began work on Flaps

Screen Shot 2019-06-01 at 5.37.36 PM

Built the cradles for the flaps. Traced a leading edge rib to make a template which I transferred to the plywood blanks. I used the bandsaw to cut out the cradles. I glued and screwed some 2×2 stock to the bottoms so I can clamp them to the bench.


Started work on the flap attach brackets. Laid out and drilled the holes in the flange of one of the left halves of the bracket. Then match drilled the other three and deburred everything. The right halves get drilled later in the process.


Today’s Time (hours): 2.0
Wing Time (hours): 146.0
Total Time (hours): 357.0


…And tanks are on hold again

Same drill as yesterday… Match drilled the right J-channel stiffener and machine countersunk the skin for the tank baffle rivets.

img_2660

Then I started dimpling the skins. I started by using the squeezer to dimple all the holes it could reach. I caught one hole off center. Then moved on the second skin. I got through the all the ones with the squeezer and then moved to the DRDT and had the skin pop off of the dimple die just as I was pulling the handle. This created an extra hole about 2 mm from the original hole. I could probably salvage both of these issues if this were a regular skin but I’d rather not chance leaky tank skins. So ordered replacements from Van’s. Not my best day of building.

The good news is I’m not stuck waiting on the replacement parts. I can move on to the flaps and/or ailerons in the meantime. Could have been worse.

Today’s Time (hours): 2.0
Wing Time (hours): 144.0
Total Time (hours): 355.0


Work resumes on the tanks

I received the J-Channel that that I ordered from Van’s. I cut it to length with a cut-off wheel in the Dremel. Then cleaned up the edges on the Scotchbrite wheel. I measured and marked the centerline. Drilled the starter hole. Clecoed it in place and match drilled the rest of the holes, clecoing as I went.


I clecoed the baffle in place and machine countersunk the corresponding rivet holes in the tank skin.


I disassembled everything final drilled the #19 holes in the skin and then deburred them as well as the holes in the j-channel. I dimpled the J-channel with the pneumatic squeezer.

In other news… My propeller was delivered! It’ll be a while before I need it but ordered it at the same time as the engine to get a discount. The engine has a much longer lead time. Expecting it to show up mid October.


Today’s Time (hours): 2.0
Wing Time (hours): 142.0
Total Time (hours): 353.0


Work continues on Fuel Tanks

Final drilled the tank attach Z brackets and machine countersunk the nutplate attach holes. I cut the brackets apart on the band saw and cleaned up all the edges on the scotchbright wheel. I riveted the nutplates in place with the squeezer.


I machine countersunk the fuel filler flanges.


I separated the shims with snips and deburred on the scotch bright wheel. I clecoed the the shims to the tank attach brackets and trimmed the ends to be flush with the brackets with snips and cleaned up the edges on the scotchbright wheel. I final drilled all the holes in the shims and dimpled them with the squeezer. I machine countersunk all the holes in the flanges of the attach brackets.


I came up short on J-channel. Not sure whether I didn’t cut the stock I had efficiently when making up the wing stiffeners or if I missed something in inventory. Either way I don’t have anything long enough to make the two 54″ tank stiffeners. I ordered a couple more pieces from Van’s. Should be here next week some time.


Today’s Time (hours): 3.0
Wing Time (hours): 130.0
Total Time (hours): 341.0


Started riveting the outboard leading edge to left wing

Clecoed the outboard leading edge assembly to the left wing assembly.

img_2574

Blind riveted the leading edge ribs to the main spar.

img_2575

I set the the wing upright on the workbench and riveted the leading edge skin to the lower flange of the main spar.

I need a bucking partner to get the upper flange. Hopefully Remy will be available tomorrow evening.

Today’s Time (hours): 2.0
Wing Time (hours): 122.0
Total Time (hours): 333.0


Riveted outboard leading edge to right wing

Completed the right outboard leading edge by riveting the landing light bracket and J channel stiffener in place.

img_2558

Clecoed the outboard leading edge to the right wing.

img_2559


Blind riveted the leading edge ribs to the main spar. I couldn’t get the rivet puller square to the river so I fabricated a wedge to safely pull the rivets at an angle. Thanks to Jared for the reminder on this technique. I had originally read about it in section 5 but had forgotten. I ended up using a piece of left over trailing edge wedge. I cut of a small section about half an inch long and drilled a hole in it to accommodate the tail of the blind rivet.

img_2562

Riveted the leading edge skin to the bottom flange of the main spar.

img_2565

Riveted the leading edge skin to the top flange of the main spar. Remy bucked for me.

img_2567

I made a home depot run and picked up a bunch to 2×4’s to construct a wing cradle.

I messed up and stripped a couple of screws that I used to attach the inspection plate to the left leading edge. Need to order a screw extractor.

Today’s Time (hours): 3.0
Wing Time (hours): 116.0
Total Time (hours): 327.0